
Custom roll up banner design is the heartbeat of a memorable trade show display, turning a simple banner into a portable ambassador for your brand. By focusing on typography, color, and concise messaging, you can create a banner that reads clearly from across the hall and invites closer inspection. Incorporate tips like bold headlines and a single strong visual, while weaving in elements from custom roll up banner design tips and roll-up banner design tips to reinforce best practices. Prioritize high-impact visuals for banners that quickly convey value and support a print-ready banners workflow. A cohesive approach to trade show banner design that aligns with your brand will drive engagement, improve recall, and guide attendees toward your booth.
Beyond the exact term for this display technology, think of a portable banner as a branding tool that blends visibility with information at a glance. Alternative terms like retractable banner stand, pull-up display, or trade-show signage capture the same idea and emphasize lightweight setup, quick deployment, and consistent branding. LSI-style connections include concepts such as visual hierarchy, color theory, legibility, and print-readiness as factors that influence performance at events. By framing the topic with these related phrases, you signal relevance to readers and search engines while keeping content approachable.
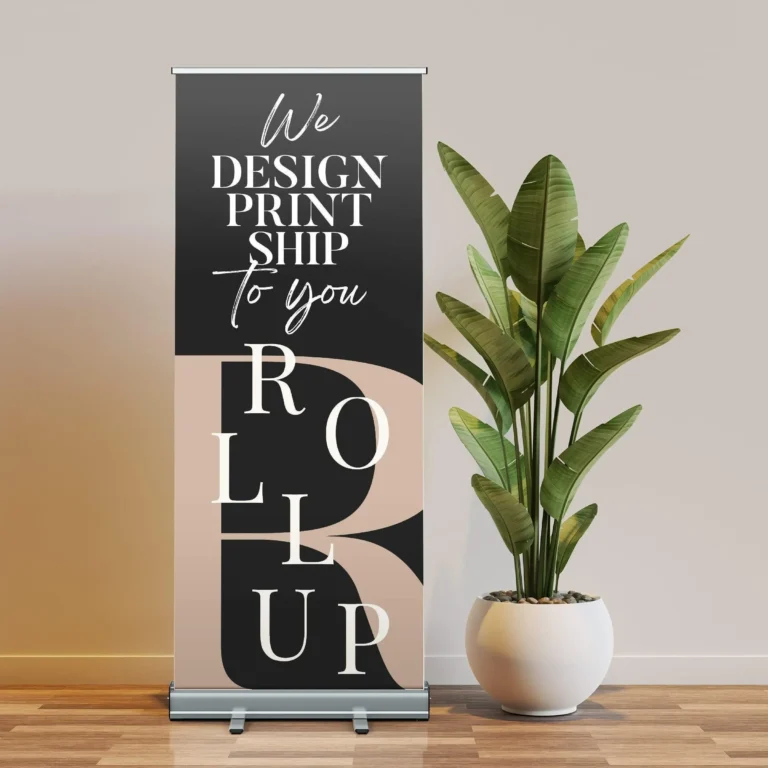
Custom roll up banner design for high-impact event visuals
Creating a custom roll up banner design begins with a clear brand brief and a portable, scalable layout that reads from across a room. By prioritizing a single focal point, bold typography, and a restrained color palette, you craft a banner that instantly communicates your value proposition. Integrating roll-up banner design tips—such as safe margins, bleed, and vector logos—helps ensure the final product remains sharp at any size and distance, whether displayed in a quiet corner or a bustling trade show floor. When you optimize for print-ready banners from the start, you reduce surprises in production and increase the banner’s impact.
Beyond aesthetics, this approach supports your overall marketing funnel. High-impact visuals for banners, paired with concise copy and a strong CTA, guide attendees to scan a QR code or visit a landing page. A design that reflects your brand voice builds credibility and memorability, so your banner stands out in crowded environments and supports lead generation after the event.
Roll-up banner design tips: layout, typography, and color strategy
Effective roll-up banner design tips begin with a strong layout: use a simple grid, place the main message in the top third, and keep text concise so readers can grasp the point at a glance. Consider a bold headline, a supporting line, and a single visual anchor to reduce clutter. Remember that readability from several meters away is essential, so plan for high contrast and large type.
Typography and color strategy are equally critical. Choose legible sans-serif fonts with ample x-height, limit to two or three typefaces, and ensure there is sufficient contrast between text and background. When coordinating with print-ready banners, verify color accuracy in CMYK palettes and preview how venue lighting may affect legibility and overall mood.
High-impact visuals for banners: imagery, icons, and concise messaging
Selecting imagery that communicates value quickly is vital for high-impact visuals for banners. Use one strong image or vector illustration as a visual anchor and lean on icons to convey complex ideas succinctly. Ensure all visuals are high-resolution (ideally 300 dpi at final size) and properly clipped to avoid halos during printing.
Concise messaging reinforces the visual hook. A short value proposition paired with a direct CTA—such as a QR code or invitation to visit the booth—can convert curiosity into engagement. Keep copy focused on benefits, and maintain a consistent tone that aligns with your trade show banner design and brand voice.
Trade show banner design: maximizing booth visibility and engagement
Trade show banner design should prioritize booth visibility and quick comprehension. Position the banner to align with the booth layout, ensuring your key message is readable from foot traffic and entry points. A cohesive design that matches your other collateral strengthens brand recognition and guides attendees toward the next step.
Accessibility and placement are essential for engagement. Use large, legible typography, ensure strong color contrast, and test scanability for any QR codes or URLs. When combined with roll-up banner design tips, this approach creates a unified, memorable experience that helps attendees locate your team and understand your value proposition at a glance.
Print-ready banners: production specs and quality control
Print-ready banners demand precise production specs to avoid surprises on site. Plan for CMYK color workflows, 300 dpi imagery, and proper bleed to prevent white edges. Deliver logos in vector formats and ensure all raster assets are high resolution, so text and graphics stay sharp when viewed from a distance.
Quality control and proofing are essential steps. Provide both CMYK proofs and soft proofs for client approval, and consider a physical test print of a small section when possible. Adhering to these print-ready banner practices minimizes reprints and ensures the final banner looks exactly as intended in the event environment.
From concept to booth: a practical design process for banners
A practical design process starts with a clear brief, identifying the target audience, primary message, and event context. Build a reusable template with safe margins, bleed, and scalable artwork. Gather assets early—vector logos, product images, and regulatory copy—and generate multiple layout options to test readability from different viewing distances.
Testing and iteration are key. Check color accuracy, text legibility, and alignment at 100% scale, and consider a quick on-site print test if feasible. By applying proven tips like custom roll up banner design tips and ensuring print-ready readiness, you’ll produce banners that not only look professional but also drive meaningful engagement at trade shows and beyond.
Frequently Asked Questions
What is Custom roll up banner design and why is it important for events?
Custom roll up banner design refers to creating portable, print-ready banners that reflect your brand with clear messaging, strong visuals, and legible typography. It matters because it provides a first impression at events, guides attendees, and reinforces your value proposition with a single, impactful message.
What are some Custom roll up banner design tips to maximize readability and impact?
Use custom roll up banner design tips such as placing the focal point in the top third, choosing large, legible typography, and limiting copy. Include one strong image, brand-aligned colors, and a clear CTA, and ensure print-ready banners are CMYK-ready at 300 dpi with proper bleed.
How can roll-up banner design tips help create high-impact visuals for banners at a trade show?
Roll-up banner design tips emphasize bold headlines, high contrast, and a single visual anchor to stand out in busy spaces. For trade show banner design, align visuals with your brand guidelines, keep typography consistent, and position a clear CTA to drive engagement.
What makes a banner print-ready in the context of Custom roll up banner design?
A print-ready banner uses vector logos, high-resolution imagery at 300 dpi, CMYK color, and proper bleed and safe margins. Deliver files in common formats (AI, PSD, PDF) with proofs to ensure sharp edges, accurate color, and print compatibility.
How should branding influence trade show banner design and Custom roll up banner design?
Branding should drive consistency across the banner and other collateral. Use your brand colors, typography, and logos to create a cohesive experience, so at a trade show the banner reinforces recognition and trust while guiding attendees to your booth.
What common mistakes should you avoid in Custom roll up banner design for print-ready banners?
Avoid cluttered messaging, poor contrast, small type, too many fonts, and misalignment. Test readability from distance, proof at 100%, and request a print test to ensure final print-ready banners meet expectations.
| Topic | Key Points / Summary | Design Takeaways |
|---|---|---|
| Focus keyword | The focus keyword is Custom roll up banner design, guiding the page title, headings, alt text, meta description, and content alignment. | Use the exact phrase in the title, main headings (H1/H2), image alt text, meta description, and anchor text to strengthen topical relevance. |
| Related keywords | custom roll up banner design tips; roll-up banner design tips; high-impact visuals for banners; trade show banner design; print-ready banners | Incorporate these phrases naturally in headings, section topics, alt text, and body copy to support SEO and topic coverage. |
| Post Title | Custom roll up banner design for High-Impact Visuals | Use the post title as the page’s H1 and ensure it aligns with the content’s promise of high-impact visuals. |
| Meta Description | Custom roll up banner design tips for high-impact visuals: learn layout, color, typography, and printing for trade shows with print-ready banners. Boost ROI. | Keep the meta description under ~160 characters, include focus and related keywords, and make it actionable. |
| Purpose of a purpose-driven banner | A roll-up banner is a primary touchpoint to attract attention, convey core message quickly, and invite further engagement. | Highlight the brand identity through color, typography, and a clear value proposition; ensure readability from distance. |
| Key design elements for high-impact visuals | Layout/Composition; Typography; Color/Branding; Imagery/Iconography; Copy Length; Visual Hierarchy | Provide a simple grid, bold headlines, high-contrast text, a single strong image, concise bullets, and a clear CTA. |
| Crafting a practical design process | Brief; Template; Asset gathering; Multiple layout options; Readability testing | Plan safe margins and bleed, test at distance, and iterate with distance-focused feedback. |
| File integrity & deliverables | Print-ready banners in vector formats for logos/icons; high-res images; CMYK proofs; clear naming conventions | Provide vector sources (.ai/.eps/.svg), CMYK final files, and a PDF proof for review. |
| Proofing & quality control | Proof at 100% scale; soft proofs; physical print test if possible | Look for color accuracy, legibility, alignment, and repeatable print results on-site. |
| Print production considerations | Single-panel substrates; durability vs. portability; CMYK; 300 dpi; bleed/safe margins | Choose durable substrates, preview colors under venue lighting, and ensure 300 dpi at final size. |
| Trade shows & event-ready considerations | Consistency with booth design; accessibility; placement strategy; multi-banner coordination | Align typography and color with other collateral; ensure large, scannable QR codes if used. |
| Common mistakes to avoid | Cluttered messaging; poor contrast; inconsistent branding; small type; over-reliance on imagery | Keep content concise, test legibility from distance, and maintain cohesive branding. |
| Practical example | “Unlock Insights Faster” with a bold visual of data visualization; top area includes logo; concise benefits; CTA with QR code | Demonstrates focal point, legible typography, relevant imagery, and direct engagement path. |
| Checklist | Define message; bold headline; brand-aligned colors; one focal image; clear hierarchy; print-ready with CMYK 300 dpi; CTA/QR; proof/test print | Use this as a production-ready reference before finalizing artwork. |
Summary
Table summarizes the base content focusing on Custom roll up banner design, covering keyword strategy, post topic, design principles, production, and practical considerations for banner success.