
Beginner embroidery design opens a world of small, satisfying results that boost confidence as you learn the basics of fabric art, including how fibers behave and how simple stitches come together. From choosing the right embroidery tools for beginners to mastering a handful of embroidery stitches for beginners, you can build a solid foundation that supports steady progress and a comfortable stitching rhythm. This friendly guide covers hand embroidery basics, beginner-friendly patterns, and practical tips that keep learning enjoyable rather than intimidating for absolute newcomers who are curious about texture, color, and form. You’ll explore tension, fabric selection, and color planning, with clear steps, practice projects, and embroidery tips and techniques you can apply to any project, helping you build consistency over time. With regular practice, you’ll turn curiosity into skill, creating charming pieces you’re excited to share and proud to display in your notebook, on your wall, or as thoughtful gifts for friends.
Frequently Asked Questions
What makes a design ideal for a Beginner embroidery design project?
A good Beginner embroidery design is simple: clear lines, larger blocks of color, and few color changes. This setup makes stitching easier, helps you build even tension, and keeps you motivated as you learn. Start with a small, manageable motif—like a flower or a monogram—to practice hand embroidery basics and essential embroidery stitches for beginners.
What are the essential embroidery tools for beginners to start a Beginner embroidery design?
Essential embroidery tools for beginners include a hoop, sharp embroidery needles (size 7–9), cotton embroidery floss, stable fabric, scissors, a fabric marker, and transfer tools. Using reliable embroidery tools for beginners helps you keep fabric taut, achieve even stitches, and enjoy the process as you start your Beginner embroidery design.
Which embroidery stitches for beginners should I learn first for a Beginner embroidery design?
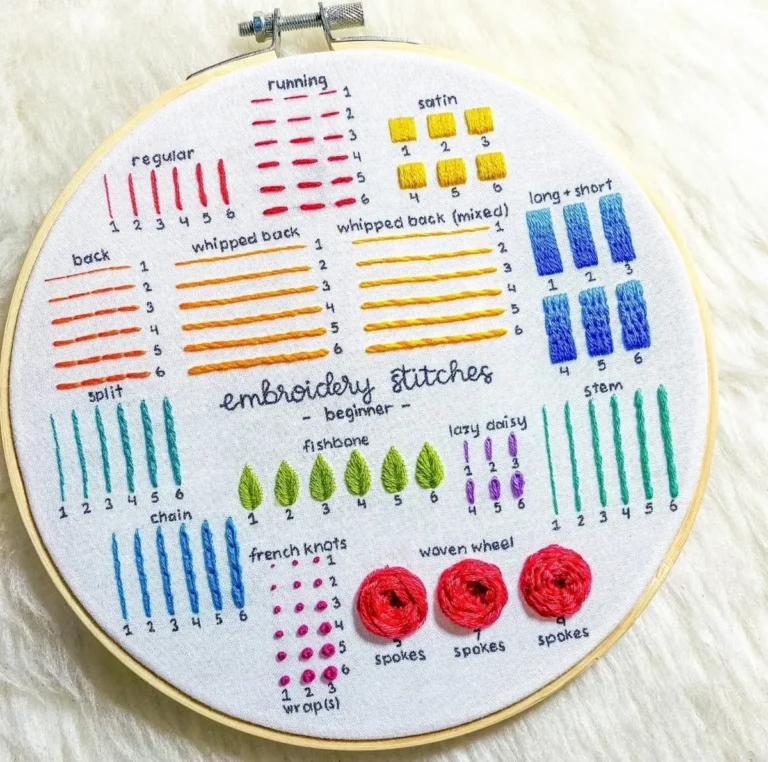
I recommend starting with the classic embroidery stitches for beginners: running stitch, backstitch, satin stitch, split stitch, and a few French knots. Mastering these embroidery stitches for beginners gives you control over outlines, fills, and small decorative elements in your Beginner embroidery design. Practice with a simple motif to build hand embroidery basics and steady technique.
What are reliable methods to transfer a Beginner embroidery design pattern to fabric?
To transfer a Beginner embroidery design pattern to fabric, try tracing with a lightbox, using water-soluble pens, or chalk/erasable markers. These beginner-friendly methods fit into hand embroidery basics, helping keep your lines accurate as you work on your Beginner embroidery design.
How should I choose colors and threads for a Beginner embroidery design?
For color planning, limit your palette to about three to five colors with high contrast against the fabric. This makes the embroidery stitches for beginners stand out and reduces confusion as you work on your Beginner embroidery design. Keep a small color chart and build your color choices gradually as you gain confidence through embroidery tips and techniques.
What does a sustainable practice routine look like for improving at a Beginner embroidery design?
Establish a sustainable practice routine by stitching 15–30 minutes most days or a few longer sessions per week. Track progress in a small stitch diary, noting stitch counts, colors, and adjustments for future pieces. This approach reinforces hand embroidery basics and helps you apply embroidery tips and techniques to your Beginner embroidery design journey.
| Aspect | Key Points |
|---|---|
| Introduction | Embarking on a beginner journey into fabric art sets pace for learning, confidence, and joy; guide covers tools, stitches, planning, and practice to build clarity and enthusiasm. |
| Beginner-friendly design philosophy | Clear lines, limited color changes, forgiving fabrics; learn thread behavior, tension, and how each stitch contributes to the final image. |
| Tools & Workspace | Hoop 6–8 in; sharp embroidery needles (size 7–9); floss split to 2–3 strands; stable fabric; scissors/marker/transfer tools. |
| Core Stitches | Running, Backstitch, Satin, Split, French knot; focus on tension and consistency. |
| Pattern Selection & Transfer | Choose beginner-friendly designs; transfer by tracing with lightbox or window tracing, water-soluble pens, chalk/erasable markers. |
| Threads & Colors | Limit palette (3–5 colors); high-contrast colors; standard cotton floss; split to 2–3 strands; plan color changes. |
| Practice Projects | Tiny sampler, simple floral motif, initial letter; keep a stitch diary for progress. |
| Hand Embroidery Basics | Tension, needle compatibility, thread management, stitch alignment; practice builds confidence and smoothness. |
| Finishing & Care | Secure ends, frame fabric taut, light ironing; gentle care: washing, air-drying, avoid direct sunlight. |
| Practice Routine | 15–30 minutes daily or several longer sessions; keep a sketchbook; note ideas, color plans, stitch notes; build a personal reference library. |
| Conclusion | General takeaway: starting with the basics builds confidence; consistent practice and enjoyment of small wins lead to progress and inspire growth. |
Summary
Beginner embroidery design invites you into a calm, creative practice where patient repetition yields visible progress. In this descriptive conclusion, you’ll see how starting with simple tools, clear patterns, focused stitches, and a steady routine helps you build confidence and enjoyment. With Beginner embroidery design, you’ll document your journey, master foundational techniques, and expand gradually to more complex textures and motifs as your skills grow.