
Patches for wardrobe have moved from niche DIY projects to mainstream style hacks that anyone can try. If you’re curious about how to sew patches on clothes, this guide breaks down simple steps and starter tips. They offer a practical, creative, and sustainable way to refresh your closet and explore upcycling clothes with patches. This beginner’s guide to patches covers choosing patches, planning layouts, and patch design ideas for jackets, as well as patches for clothing ideas to suit different wardrobes. By the end, you’ll see how patches for wardrobe can transform a tired item into a personal statement.
Viewed through an alternative lens, this practice becomes garment customization through patchwork embellishments, fabric badges, and textile appliques. Using LSI ideas, related topics such as DIY clothing alterations, sustainable fashion upgrades, and affordable wardrobe refreshes are woven into the narrative. Consider patches as modular adornments that can be added, rearranged, or removed—perfect for jackets, jeans, bags, and accessories. Beyond aesthetics, the approach aligns with upcycling, repairable fashion, and storytelling through color, texture, and symbolism.
Patches for Wardrobe: Start Here with Practical Personalization
Patches for wardrobe offer a practical, creative, and sustainable way to refresh clothes without buying new items. They let you transform a tired denim jacket or a plain tee into a piece that reflects your personal style, while extending the life of garments you already own.
As a beginner, you can start with simple iron-on patches or sew-on patches and gradually experiment with embroidery. This approach aligns with a beginner’s guide to patches, and you’ll learn how to select patches, plan layouts, and apply them confidently. If you want to know how to sew patches on clothes, this guide covers it step by step.
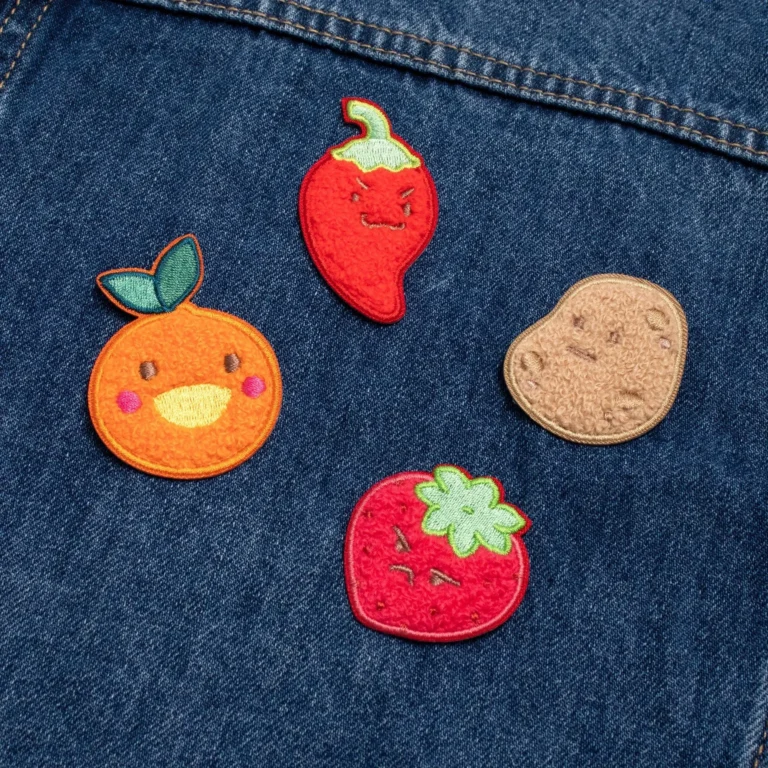
Choosing Patches: Color, Size, Motif, and Style Alignment
Choosing patches begins with color harmony, size decisions, and motifs that fit your existing wardrobe. A denim jacket, for example, often benefits from navy, white, and a pop of red patches, making the piece versatile across outfits.
Think about patch size and placement as part of your overall design. Larger patches act as focal points, while smaller ones provide subtle accents. This is a good moment to consider patches for clothing ideas you might try on future projects.
Patch Formats and Application: Iron-On, Sew-On, and Embroidery Techniques
Patch formats and application methods vary: iron-on patches use heat-activated adhesive, sew-on patches are stitched for durability, and embroidered patches can be both decorative and premium in appearance.
When you choose sew-on patches, the process follows the basics of how to sew patches on clothes: thread a needle, secure with small stitches, and finish with a neat border. If you prefer iron-on patches, follow the manufacturer’s directions, then reinforce by stitching around the edge for long-lasting wear.
Patch Design Ideas for Jackets, Jeans, and Bags
Design ideas for jackets, jeans, and bags include color blocking, collage effects, and monochrome statements. Layering patches of different shapes and sizes on a denim jacket can quickly transform a basic piece into something personal and story-driven.
Theme-driven patches (travel, music, or nature) can guide layout on a backpack or jean jacket. Minimalist accents—like a single small patch on a sleeve—can still create a chic, curated look.
Beginner’s Guide to Patches: Planning, Budgeting, and Practice
A beginner’s guide to patches covers planning, budgeting, and practice. Start by picking one garment you wear often and planning a simple layout with a few patches to build confidence.
Sketch a rough map of patch placement, practice stitches on scrap fabric, and set a budget that includes backups. Embrace experimentation because patches are forgiving and reversible in many cases.
Upcycling Clothes with Patches: Sustainable Style and Patches for Clothing Ideas
Upcycling clothes with patches offers a sustainable, budget-conscious path to refresh your wardrobe while reducing waste. By choosing patches that echo the fabric and color palette of your existing pieces, you can create cohesive looks without buying new items.
Applying patches to jackets, jeans, or bags can spark ideas for patches for clothing ideas, turning old items into new favorites. This approach keeps your wardrobe evolving with your taste and helps you tell a story through color, texture, and motif.
Frequently Asked Questions
What are patches for wardrobe and how can a beginner’s guide to patches help me get started?
Patches for wardrobe are decorative fabric pieces that you sew or adhere to clothing to customize, repair, and extend garment life. They support upcycling and personal expression. For a beginner, start simple: pick forgiving fabrics like denim, begin with iron-on patches, map placement with chalk, then practice basic stitching around the edge for durability.
How to sew patches on clothes: what are the essential steps for a durable finish?
First choose patches appropriate for the fabric. Prepare the garment (wash, dry, and press). Position patches and secure with pins. For sew-on patches, stitch around the edge with a running stitch or zigzag near the border and reinforce with a few inner stitches. If using iron-on patches, follow the manufacturer’s instructions and then add a few extra stitches for longevity.
How can you upcycle clothes with patches to refresh old jackets and backpacks?
Upcycling clothes with patches lets you refresh tired items by planning a cohesive or bold layout. Start by selecting patches that fit your color scheme or theme, sketch a patch map, and test placement. Apply patches with iron-on basics, then sew edges for durability, building a collage or a unified look across the piece.
What are patch design ideas for jackets to create bold or subtle statements?
Patch design ideas for jackets include color blocking with a limited palette, a collage of varied sizes, or a monochrome mix that uses texture rather than color. You can build a theme (travel, music, nature) across the jacket and place patches on the back, sleeves, and chest for balance, mixing shapes for visual interest.
How should I choose patches for wardrobe to match my style and avoid common mistakes?
Choose patches for wardrobe with color harmony in mind, matching the garment’s dominant tones. Vary patch sizes for balance and pick motifs that reflect your interests for a personal signature. Check backing quality and fabric compatibility, and start with one ready garment to keep the project manageable while testing placement before adhesion.
How can I care for patches for clothing ideas to extend their life and keep colors vibrant?
Care patches for clothing ideas by washing inside out on a gentle cycle and air-drying to reduce wear. If you used iron-on patches, refresh the bond with a light re-press after several wears. For sew-on patches, avoid aggressive washing or opt for hand-washing heavily patched areas to preserve color and adhesion.
| Key Point | Summary |
|---|---|
| Introduction | Patches for wardrobe have moved from niche DIY projects to mainstream style hacks that refresh clothes without buying a full new wardrobe. |
| What are patches for wardrobe? | Patches are fabric, embroidery, or other decorative elements sewn or adhered to clothing and accessories. They can be tiny motifs or large panels. When used thoughtfully, patches add personality, cover blemishes, and create a cohesive aesthetic across an entire outfit. They are removable or reversible in some cases, allowing experimentation without permanent changes. |
| Patch formats | – Iron-on patches: heat-activated adhesive; great for cotton/denim; may require extra stitching for durability. – Sew-on patches: durable; typically stitched around the edges with a running stitch or satin stitch; best for thick fabrics or areas that will receive a lot of wear. – Embroidered patches: focal point; can be ironed or sewn on; premium look with detailed stitching. |
| Sustainability and benefits | From a fashion and sustainability perspective, patches offer several advantages. They let you upcycle old garments instead of buying new ones, stretch a limited budget further, and create a wardrobe that evolves with your tastes. With patches, you can tell a story through color, texture, and motif—everything from vintage logos to contemporary graphics can come together in a single jacket or bag. |
| Getting started: planning and choosing patches | Before you reach for your needle and thread, take a moment to plan. A little prep saves time and helps you avoid missteps that can lead to frustration. – Define your goal. Do you want a bold statement piece, or a more cohesive, curated look? – Consider the garment. Denim is among the easiest fabrics for patches due to its sturdy weave. Knit tops require careful placement to avoid stretching. Bags, hats, and wallets provide more surface area for creative patch arrangements. – Decide on patch types. For beginners, iron-on patches are a friendly starting point, with sew-on patches offering longer-lasting results. If you’re into embroidery or unique textures, embroidered patches can become the centerpiece of your design. – Plan placement with care. A simple rule of thumb is to place patches away from underarm seams or high-stress areas unless you’re reinforcing with extra stitching. Use chalk or removable fabric markers to map out position before you commit. – Gather materials. You’ll need patches, fabric scissors, needles, thread in a matching or contrasting color, a pin or fabric tape, and a suitable iron or sewing machine. If you want to detach patches later, consider heat-seal options that allow removal. |
| How to choose patches that fit your style | Your patches should complement your existing wardrobe or help you explore a new aesthetic. Here are a few practical guidelines: – Start with color harmony. Choose patches that echo the dominant colors in the garment or in your usual outfits. A denim jacket with navy, white, and a pop of red patches can be surprisingly versatile. – Use size strategically. Larger patches draw attention and act as focal points; smaller patches work well for a more understated effect. A mix of big and small can create a dynamic, balanced look. – Think about motif and meaning. Patches can carry meaning—an insignia, a travel stamp, or a motif that reflects your interests. That meaning can become a personal style signature over time. – Quality matters. Look for patches with tight stitching, quality fabric, and durable backing. A patch with peeling edges or loose threads can ruin the effect quickly. – Consider fabric compatibility. For smooth fabrics like cotton or canvas, iron-on patches with a strong adhesive work well. On knits or stretch fabrics, sew-on patches are generally more reliable. |
| Step-by-step: applying patches | – Prepare the garment. Wash and dry the item to pre-shrink it. Iron out wrinkles so patches sit flat. Lay the garment on a sturdy surface and place a pressing cloth or parchment paper where you’ll work. – Position patches. Place patches on the garment according to your plan. Use pins or fabric-safe tape to hold them in place. Recheck alignment from multiple angles. – For iron-on patches: follow the patch manufacturer’s instructions, but a safe baseline is to apply heat with firm pressure for about 15–20 seconds, then let the patch cool. If your fabric is thick or patch edges curl, cover with parchment paper and reapply heat. For extra durability, stitch around the edges after ironing. – For sew-on patches: thread a needle with a color that matches and use a running stitch or backstitch around the patch’s edge. A classic finish is a tight zigzag stitch around the border. A thimble helps on thicker fabrics. Secure the thread with a knot, trim excess, and check that stitches sit flat. – Troubleshooting patches that lift: If a patch starts to peel, add a few secure stitches around the edges or reinforce corners. For heavier patches on lightweight fabrics, reinforce with a thin support fabric behind the garment or double stitch around the edge. – Care after application: Hand wash or gentle cycle, and air dry to extend patch life. If you must machine wash, turn the garment inside out and use a gentle cycle. Avoid high heat on patches and backing to prevent detachment. |
| Creative design ideas: patches for jackets, jeans, and bags | Patch design ideas for jackets and jeans are endlessly versatile. Here are a few approaches to inspire your next project: – Color blocking with patches. Choose patches in a limited color palette and arrange them to create a color-block effect. – The collage effect. Layer patches of different sizes, shapes, and motifs to create a vibrant, collage-inspired look. – The monochrome statement. Use patches that share a similar hue but vary in shade and texture. – Theme-driven patches. Build a story around your patches—travel, music, or nature—and place patches that reflect that theme on a backpack or a jean jacket. – Minimalist accents. For a subtle update, choose a single small patch and place it on a sleeve or chest pocket. |
| A beginner’s guide to patches: planning, budgeting, and practice | Starting with patches can be as simple as a few well-placed items on a favorite jacket. Here’s a practical plan for beginners: – Start with a single garment. Pick one piece you wear often, such as a denim jacket or a backpack, and experiment with 2–4 patches. This keeps the project manageable and less overwhelming. – Create a rough patch map. Sketch a simple layout on paper or use a digital board to visualize placement before you cut into fabric. This helps avoid mistakes and reduces waste. – Practice on scrap fabric. If you’re new to sewing patches, practice stitching techniques on scrap fabric. It’s a low-stakes way to improve your stitches and your eye for alignment. – Budget wisely. Patches range in price depending on material, size, and brand. Plan a budget that allows for a few patches you truly love plus a backup option in case you change your mind. – Embrace experimentation. The beauty of patches is their reversibility (in many cases) and their forgiving nature. If a patch doesn’t look right, you can move it, replace it, or remove it and start again. |
| Common mistakes and troubleshooting tips | Even seasoned patch enthusiasts make a few missteps from time to time. Here are common issues and how to fix them: – Patch edges curl after washing. Solution: reinforce with extra stitching around the edge from the inside, or choose patches with better backing glue or a tighter sew-on finish. – Patches sit awkwardly on curves (shoulder seams, elbows). Solution: choose patches with flexible backing or apply small darts around patch edges to accommodate fabric shape. – Iron-on patches peeling after a few wears. Solution: sew around the edge to secure them; if heat-activated glue isn’t enough, a small zigzag stitch works wonders. – Patches that don’t align with grain. Solution: use chalk to draw on fabric, align with shirt or garment seams, and test fit before final adhesion. |
| Maintenance and long-term care | Patience and proper care extend the life of patches for wardrobe transformations. Wash inside out on a gentle cycle, use mild detergent, and avoid high-heat drying. If you opt for iron-on patches, a quick touch-up with a warm iron after several wears can refresh the bond. For heavily patched areas, consider occasional hand-washing to minimize stress on the patches. |
Summary
Patches for wardrobe transformations offer a powerful, accessible way to express your personal style. This descriptive journey invites you to see clothing as a canvas for color, texture, and memory, where a few patches can turn a tired jacket into a story you wear. Patches are not just accessories; they are small acts of upcycling that extend the life of garments and reduce waste. With mindful planning, careful placement, and patient application—whether iron-on or sew-on—your wardrobe can evolve into a cohesive, expressive collection of pieces that reflect who you are.