
Printing and Assembly Guide for Polished Custom Roll Up sets the stage for banners that look crisp, cohesive, and ready for professional events. Designed for designers, marketers, and print professionals, it blends practical printing specs with assembly steps to ensure consistent outcomes across campaigns and client expectations. For polished custom roll up printing, consider substrate choices, color fidelity, and edge-to-edge clarity to make a lasting impression. Think through custom roll up display setup to optimize portability, mounting, and tension, ensuring every installation reads as polished and purposeful. By documenting a repeatable workflow and focusing on precision, teams can deliver reliable results that reinforce brand credibility at every event.
Beyond the basics, you can frame the discussion with roll up banner assembly tips and related topics like substrate selection, protective finishes, and quick-change artwork. In line with Latent Semantic Indexing, using related terms such as printing and mounting roll up banners, premium materials, and durable finishes helps readers connect ideas naturally. This approach supports a reader-friendly narrative that highlights readability, resilience, and portability across event settings. By uniting design, print workflow, and hardware considerations under broader concepts, teams can scale production while maintaining a polished brand voice.
Printing and Assembly Guide for Polished Custom Roll Up: Best Practices for Consistent Branding
In the world of polished custom roll up printing, achieving a crisp image relies on careful alignment of design and production steps. This guide emphasizes a repeatable workflow that designers, marketers, and print professionals can follow to ensure the banner looks professional when deployed for trade shows, retail displays, or corporate events. By aligning design decisions with printing and mounting roll up banners workflows, you can deliver a durable, high-impact display that communicates brand equity.
From selecting substrates to final assembly, the emphasis is on color fidelity, edge-to-edge clarity, and reliable hardware. The ‘Printing and Assembly Guide for Polished Custom Roll Up’ frames the process around concrete checkpoints, ensuring each banner projects polish and consistency across batches for local displays or national rollouts. It also serves as a practical reference for teams aiming to meet the expectations described in the professional roll up banner guide.
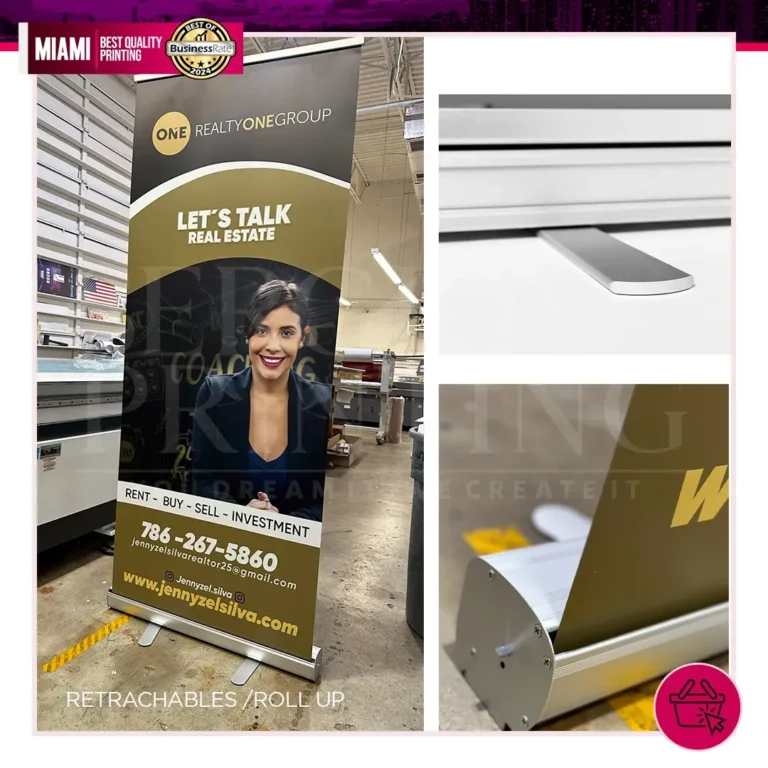
Understanding Substrates and Finishes for Polished Roll Up Displays
Choosing the right banner substrate—vinyl for durability or fabric for a premium feel—shapes both the look and life of a polished roll up. Consider glare, color vibrancy, and outdoor robustness when evaluating substrates, laminates, and coatings. In this context, print quality and mounting performance are interdependent: a great image can underperform if the material warps or the finish dulls in bright light.
Match substrate choice to the assembly workflow: rigidly controlled lamination reduces scuffs, while fabric can demand different finishing and tensioning. When we discuss polished custom roll up printing and rolling assembly, the material choice influences how easily you achieve edge-to-edge color, minimal curl, and smooth operation in roll up banner assembly tips. In short, material decisions set the baseline for a professional roll up banner guide that teams can rely on across events.
Design, Prepress, and Color Management for High-Impact Roll Up Banners
Design decisions directly affect readability and impact. For polished custom roll up printing, prioritize safe margins, 0.125–0.25 inch bleed, legible typography, and high-resolution imagery (150–300 dpi) to preserve sharpness at final size. Build your files with consistent branding, strong contrast, and clear hierarchy to support quick comprehension from several meters away.
Color management matters just as much as layout. Use a calibrated workflow, embed ICC profiles, and proof with devices that mirror the final print. When you print and mount roll up banners, ensure fonts are embedded or outlined to prevent substitutions, and consider soft gradients or transparency by running controlled proofs. This approach aligns with the professional roll up banner guide and ensures visual fidelity across display environments.
Printing and Mounting Workflow: From File Preparation to Assembly
A robust workflow reduces surprises from the press to the stand. Start with preflight checks—verify bleed, margins, font integrity, and color profiles—and perform a small print proof to validate color and sharpness before mass production. This stage helps align expectations with your clients and keeps the project on track for press-ready output and timely shipping.
Prepare for assembly by allowing prints to acclimate, removing protective liners, and laying out all components in a clean workspace. When mounting, align the top edge precisely with the roller axis and tension evenly to avoid wrinkles. A repeatable process for printing and mounting roll up banners ensures consistent results across batches and supports a polished display standard in line with the roll up banner assembly tips.
Quality Control, Troubleshooting, and Long-Term Maintenance
Even seasoned teams encounter issues such as edge curling, color drift, or misalignment. Implement multi-stage checks—from preflight through in-process QC and final inspection—to catch problems early and keep production moving. Simple fixes like re-seating the banner or reprinting a calibration strip can save waste and protect brand integrity.
Maintenance matters after you ship. Inspect edge seams and rollers, protect prints with laminate or sleeves, and store banners rolled in protective tubes away from direct sun. Adopting a professional roll up banner guide mindset helps you extend life, maintain color stability, and ensure every deployment still looks polished and credible.
Scaling, Reuse, and Best Practices for a Polished Roll Up Campaign
For ongoing programs, reuse and batch coordination are essential. Repurpose artwork across events and maintain a library of approved templates to reduce turnaround times while preserving brand consistency. Coordinating large batches requires reliable supply chains, standardized hardware, and clear documentation for a consistent custom roll up display setup.
A growth-oriented approach combines thorough storage practices with a forward-looking maintenance plan. Regularly refresh artwork, check hardware integrity, and document tolerances so future iterations stay aligned with the professional roll up banner guide. With disciplined processes, you can scale campaigns, reduce errors, and deliver a consistently polished look at every event.
Frequently Asked Questions
In the Printing and Assembly Guide for Polished Custom Roll Up, what workflow is recommended for polished custom roll up printing and assembly?
Follow a repeatable workflow. Start with preflight and bleed checks (0.125–0.25 in bleed, safe margins) and a calibrated color workflow with embedded ICC profiles. Print at 150–300 dpi final size on vinyl or fabric, review proofs, then perform quality control for misregistration or color issues. Finally, prepare for assembly by acclimating the print, attaching the banner to the roller, aligning the top edge, and ensuring smooth retraction and even tension for a polished look.
What roll up banner assembly tips should be applied when planning a polished custom roll up printing project?
Use a structured approach: attach the banner to the roller, align the top edge, secure it to the stand, verify smooth retraction, and check edge alignment. Following these roll up banner assembly tips helps ensure a clean, professional display.
What materials and hardware choices support a professional custom roll up display setup in the context of polished printing?
Choose a durable banner substrate such as vinyl for color and durability or fabric for a premium look and lower glare, with optional laminate. Pair this with a stable base and a smooth-operating roller to ensure a polished, accurate display and color fidelity.
What are essential printing and mounting roll up banners prepress considerations for a polished custom roll up printing project?
Ensure safe margins and bleed (0.125–0.25 in), legible typography, high-resolution imagery (150–300 dpi at final size), and brand-consistent colors. Prepare artwork with proper bleed, test color profiles, and verify file formats such as PDF or TIFF with embedded fonts to preserve layout integrity.
What are common issues in polished roll up printing and assembly, and how does the professional roll up banner guide suggest fixes?
Common issues include wrinkling or curling, faded colors, misalignment, scuffs, and blurry text. Fixes involve checking tension on the roller, reseating the banner, rechecking color management and ICC calibration, reprinting with adequate bleed and higher resolution logos, applying protective laminate, and reassembling with careful edge alignment.
How should you maintain, store, and reuse polished roll up banners to extend their life in polished custom roll up printing projects?
Store banners rolled with the printed surface protected, avoiding extended direct sunlight. Inspect edge seams and the roller for wear, replace worn components, and refresh artwork as needed. Regular maintenance supports a consistent professional appearance across events.
| Aspect},{ | Key Points |
|---|---|
| Introduction/Overview | In trade shows, retail displays, and corporate events, a polished look helps distinguish banners. This guide outlines printing specs, design, materials, assembly, and common pitfalls to ensure consistent quality across polished custom roll ups. |
| Printing Process | Choose substrate (vinyl/fabric) and retractable stand; target sharp detail, color fidelity, and edge-to-edge clarity. Focus on color management, 150–300 dpi, embedded ICC profiles; test transparency/gradients; use PDF/TIFF with embedded fonts. |
| Design & Prepress | Bleed 0.125–0.25 in; safe margins; legible typography with high contrast; high-res imagery (150–300 dpi); align with brand colors; prepare artwork to reduce production time; ensure clean files with proper bleeds. |
| Materials & Hardware | Banner substrate: vinyl for durability; fabric for premium feel; lamination/coatings to protect; stable base and smooth roller; high-quality hardware to prevent warping and misalignment. |
| Printing & Assembly Workflow | Preflight checks; correct color profile; small proof; QC; acclimate print; assemble: attach banner, align top edge, ensure smooth retraction; final angle checks; document SOPs for scalability. |
| Troubleshooting & QC | Common issues: wrinkles, fading, misalignment, scuffs, blurry logos. Fixes: adjust roller tension, verify ICC profiles, reprint with bleed, apply protective laminate, ensure high-res assets; perform multi-stage QC. |
| Maintenance & Storage | Store rolled banners protected; avoid prolonged direct sun; inspect edge seams and roller; replace worn components; reuse artwork with branding; maintain hardware integrity. |
| Quick Checklists | Design: clear typography and brand-consistent colors; Print: high-res with bleed and tested color profiles; Hardware: stable base and smooth roller; Assembly: precise alignment and tension; Maintenance: protective storage and artwork refresh. |
Summary
Printing and Assembly Guide for Polished Custom Roll Up is a comprehensive resource for designing, printing, and assembling polished roll-up banners that convey professionalism and credibility. By detailing prepress, printing specs, materials, assembly steps, QC, and maintenance, this guide helps teams deliver consistent quality for both single displays and large campaigns, enabling brands to capture attention and communicate their message clearly across events and venues.