
Embroidered design for beginners invites you into a patient, practical journey from first stitches to confident finishes. A focus on beginner embroidery stitches and a structured path helps you build a reliable toolkit, reduce frustration, and see steady progress. If you’re wondering how to start embroidery, this plan emphasizes technique, tension, and deliberate practice over speed. Starter embroidery projects provide quick wins that build momentum and give you opportunities to apply core stitches in real pieces. As you grow, you’ll move toward mastering embroidery design with mindful design choices, stitch harmony, and the fundamentals of beginner embroidery techniques.
For newcomers to this craft of thread and fabric, consider entry-level needlework terms and a learner-centered approach that makes the basics approachable. Think of it as a gradual curriculum in stitch work that blends practical applications with thoughtful design, so beginners gain confidence while building real results. The second part of this overview leans on related concepts such as simple motifs, color planning, and transfer methods, which align with LSI principles and help search engines understand the topic. By framing the journey as a series of doable steps—practice, project, portfolio—you’ll see how easy it is to move from curiosity to consistent practice and growing mastery.
Embroidered design for beginners: A practical roadmap to confident stitching
Starting embroidery with a clear, structured plan makes the learning curve gentler. By focusing on a core set of beginner embroidery stitches, straightforward transfer methods, and a few starter embroidery projects, you create a reliable roadmap from first stitches to confident finishes. This approach answers how to start embroidery with intention—prioritizing technique over speed so you build solid habits from day one. As you practice, you’ll gain comfort with fabric behavior, thread tension, and stitch consistency, laying the groundwork for future, more complex designs.
With each small project, you reinforce a skill and build confidence. Practice one stitch well, then combine it with another to move toward mastering embroidery design as a whole. By emphasizing foundational beginner embroidery techniques, you stay steady, reduce overwhelm, and celebrate the moment your edges become neater and your color placement more deliberate.
How to start embroidery: Essential tools, setup, and beginner techniques
Tools set the tone for your early embroidery journey. Gather a compact, dependable kit: a hoop, sharp scissors, a handful of six-strand floss, and a light, even-weave fabric. This setup answers how to start embroidery smoothly and keeps you focused on practice rather than hunting for supplies.
Develop a simple routine: dedicate a short daily cycle to stitching, winding threads, and returning to your design with fresh eyes. This steady practice reinforces beginner embroidery techniques and helps you translate what you learn into tangible starter embroidery projects faster.
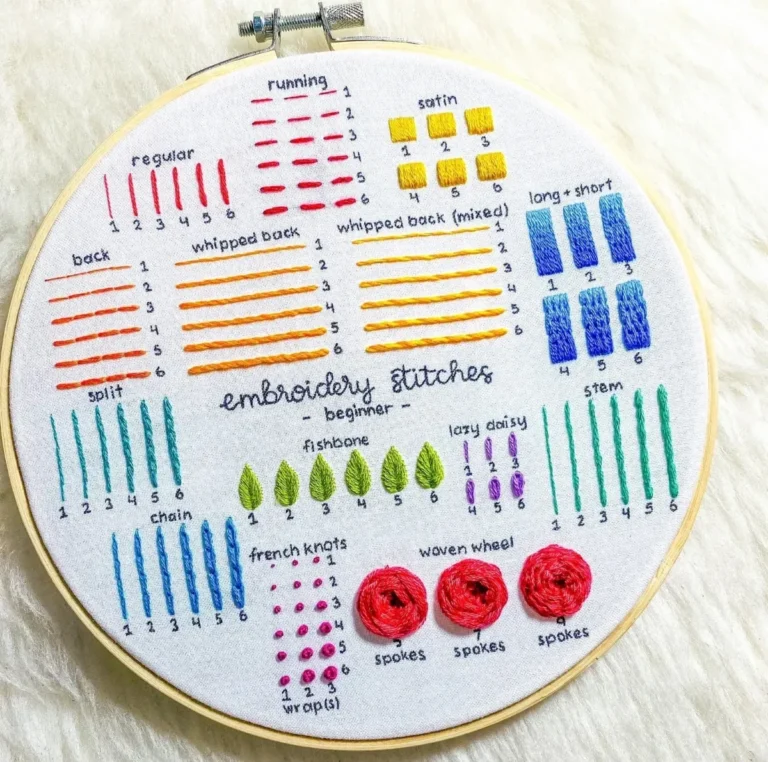
Core stitches and beginner embroidery techniques you should master
Core stitches form the backbone of your technique. Start with running stitch, back stitch, satin stitch, chain stitch, and a French knot, then repeat them on scrap fabric until your tension is even and your movements relaxed. These are exactly the beginner embroidery stitches that lay the groundwork for more ambitious work.
Keep a mindful practice principle: practice on scrap fabric, review your work, and correct any puckering or uneven lines. Focusing on even spacing and consistent thread tension supports beginner embroidery techniques and keeps you from developing bad habits that hinder later progress.
Starter embroidery projects to practice and celebrate small wins
Starter embroidery projects provide quick wins and motivation. Try motifs on a fabric swatch, a decorative border on a tea towel, or a small hoop art piece using just one or two stitches. These starter embroidery projects let you apply the basics in a low-pressure setting.
Select designs that are forgiving and repeatable, then assess your results honestly. Each completed piece builds your confidence and demonstrates progress in the craft, supporting your journey toward mastering embroidery design.
Designing, transferring, and building your first motif: from idea to stitched design
Designing and transferring your first motifs moves you from idea to stitched design. Start with simple shapes and transfer them cleanly using tracing or light pencil marks; choosing high-contrast colors helps you see each stitch clearly. This process bridges creativity and technique and keeps you focused on the path to mastering embroidery design.
Once your motifs are in place, map a color sequence and test stabilizers on a scrap piece first. Planning ahead reduces rework and nurtures confident planning, a crucial habit in how to start embroidery and in producing repeatable results in your projects.
From practice to progress: moving toward mastery of embroidery design
From practice to progress, you’ll merge stitches, layer colors, and experiment with textures. Start pairing stitches to create simple textures and then push toward more complex motifs as your eye for detail grows. This step demonstrates ongoing progression toward mastering embroidery design.
Finally, curate a small portfolio of finished pieces, photograph your work, and track what you learned from each project. Regular reflection helps you celebrate steady growth, keeps motivation high, and anchors your progress in a solid habit of practice.
Frequently Asked Questions
What are the first steps to create an embroidered design for beginners?
Start with a simple motif and a short practice routine to build confidence in embroidered design for beginners. Focus on a few core stitches, learn basic transfer methods, and assemble a small starter kit to support steady progress. Remember, the goal is consistent tension and neat stitches, not speed.
Which beginner embroidery stitches should I learn first for a solid foundation in embroidered design for beginners?
Begin with the core stitches that underpin beginner embroidery techniques: running stitch, back stitch, satin stitch, chain stitch, and French knot. Practice each on scrap fabric until the tension, spacing, and stitch length feel comfortable. This foundation directly supports any embroidered design for beginners you want to create.
What tools and setup do I need to learn how to start embroidery the right way for beginners?
To start embroidery the right way for beginners, assemble essential tools: an appropriate hoop, sharp scissors, a small selection of floss, a few needles, and a light fabric. Choose transfer methods you’re comfortable with (pencils, water-soluble pens, or tracing paper) and keep your workspace tidy. As you gain experience, you can add stabilizers and more colors for future projects.
How do I transfer designs onto fabric for embroidered design for beginners?
Transferring designs onto fabric for embroidered design for beginners involves choosing a simple motif, high-contrast colors, and a reliable transfer method. Print or trace the design at the actual size, then lightly mark the fabric and use a stabilizer if the fabric is loose-weave. Clear transfers reduce rework and help you focus on stitch placement.
Which starter embroidery projects are best for building real skills?
Starter embroidery projects are ideal for building real skills: a simple motif on a scrap or pocket, a decorative border on a towel, a small hoop art piece, or a patch with a few words. Completing these targets gives quick wins and reinforces the beginner embroidery techniques you’ve learned. Each small project refines line quality and color placement.
How can I move from practice to mastering embroidery design as a beginner?
To move from practice to mastering embroidery design, begin combining stitches for texture, layer colors for depth, and gradually tackle more complex motifs. Build a small portfolio of finished pieces to track progress and stay motivated. The path to mastering embroidery design is steady, focused practice, not rushing.
| Section | Key Points |
|---|---|
| Introduction | Embroidery is accessible to makers of all levels; aims to guide from first stitches to confident finishes; you don’t need years of practice or expensive gear; with the right approach, you can build skills and confidence through a practical, stepwise path. |
| 1. Structured Beginning | Start with a plan and a toolkit of dependable stitches, transfers, and project ideas; a deliberate approach reduces frustration and accelerates progress; focus on fabric behavior, thread tension, and stitch consistency; learn one stitch well, then combine them for progress and joy. |
| 2. Tools, Materials, and Setup | Assemble a small kit: hoop, sharp scissors, a few colors of floss, and neutral fabric; transfers, needles, and stabilizers matter more as projects grow; basics: hoop size, thread palette, needles, fabric, and transfer methods; aim to learn fundamental stitches and transfers first. |
| 3. Core Beginner Stitches | Practice running stitch, back stitch, satin stitch, chain stitch, and French knot; tips for clean results; practice on scrap fabric; short, daily practice builds muscle memory and confidence. |
| 4. Designing and Transferring Motifs | Choose simple motifs and transfer them cleanly; tips: high-contrast colors, print/draw to actual size, use light transfer methods, and stabilize loose fabrics; plan color sequence to minimize re-threads; accurate transfers reduce rework. |
| 5. Starter Projects | Select small, forgiving projects for quick wins: motif on fabric swatch or pocket; decorative border on tea towel; small hoop art with stems; patch with a single word in back stitch; these build a sense of accomplishment and highlight stitch control and color placement. |
| 6. Common Challenges | Loose tension or loopy threads; puckering fabric; uneven stitches; fraying or knotting; difficulty transferring designs; address with practice, better tools, scrap testing, and patient adjustments. |
| 7. From Practice to Progress | Move from basic stitches to combinations for texture; layer colors for depth; build a small portfolio to visualize progress; progress comes from eye for detail, color harmony, and stitch discipline across fabrics and transfers. |
| 8. Care, Finishing, Longevity | Finish with secure threads and careful trimming; press from the back with a cloth; follow washing guidelines; store away from direct sunlight to guard color; proper finishing extends longevity of embroidered pieces. |
| Conclusion | Mastering embroidered design for beginners is a journey that rewards patience, consistent practice, and thoughtful project selection. By starting with the essentials—clear goals, the right tools, and a few core stitches—you’ll build a strong foundation that supports more advanced techniques over time. Focus on those beginner stitches, practice deliberately, complete starter projects, and you’ll gain confidence to tackle increasingly complex motifs. The joy of embroidery comes as much from the process—the rhythm of the needle, the color pops, and the personal story told with each stitch—as from the finished piece. |
| Note | This table summarizes the base content; sections reflect the guide’s progression from Introduction through Care and finishing, ending with a beginner-focused conclusion. |